CAB: Door & Tile Measuring System
ProTable-CAB is a two axis measuring system designed for quick and affordable length and width measurements of non-ferrous products such as glass, wood, ceiling tiles and other like products. Several standard configuration exist that offer size choices and optional computer/software choices.
BASELINE CONFIGURATION (Option 1):
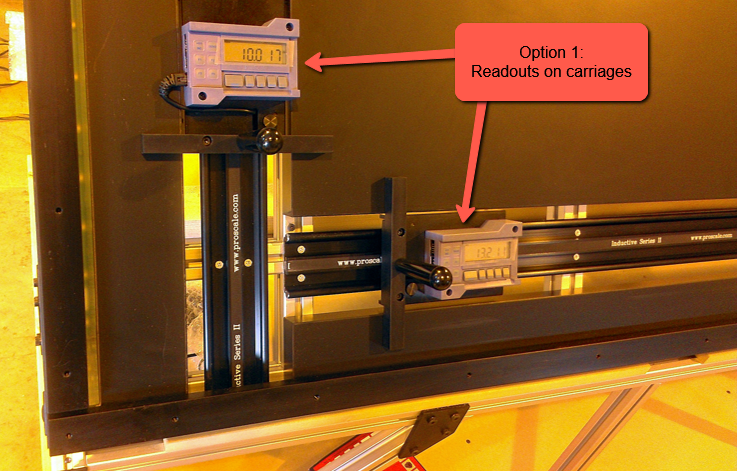
The standard ProTable-CAB system is made with a 40 inch (vertical) x 60 inch (horizontal) measuring range. The moving carriages are built with battery powered digital readouts. With this system, an operator places a part onto the horizontal fence, then against the vertical fence. They read the dimensions on the digital readouts and compare the values for width and height to a ‘runner document’ or a production sheet. The operator then decides if the part measured is good or bad.
Notes about the baseline configuration:
- Product measurements are not saved.
- No input power is required; a battery in each readout lasts 7-10 months.
Common to all versions (before add-ons, accessories, or customization):
- There is a very bright light bar included along the edge of the vertical fence. This allows the operator to visually inspect for squareness of the part. (With the light, the amount of out-of-square is subjective; not measured.)
- The tilt angle of the table is adjustable for some size ranges.
- Minimum measuring range for width is ~10 inches. (An optional offset block can be added for smaller parts.)
- Fences are elevated off table surface slightly to allow dust/chips to escape automatically. Standard fences are ¾” thickness, made from hard anodized aluminum.
- Jaws on carriages are 1” tall x 8” wide. Made from precision machined, hard anodized aluminum.
“V configuration” (Option 2):
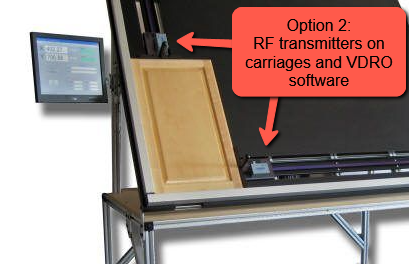
If your company makes many of the very same size parts over and over, and parts are made to restock your inventory (not made to fill a specific customer’s order), the “V” configuration may be for you.
This version replaces the digital readouts on the carriages with RF transmitters. Both of the RF transmitters send measurements to a remote RF receiver as the carriages are moved. This RF receiver connects to a computer on a USB port. A 22" touchscreen and a copy of VDRO software is included with this version. (A computer is not included.)
After the VDRO software is installed on your computer, and connection to the remote receiver is made, you can build a database of your parts in the VDRO software. Each part record will include a part name/number, nominal width/height dimensions, and allowable tolerance for the parts. (You can also add images or PDF documents to each record.)
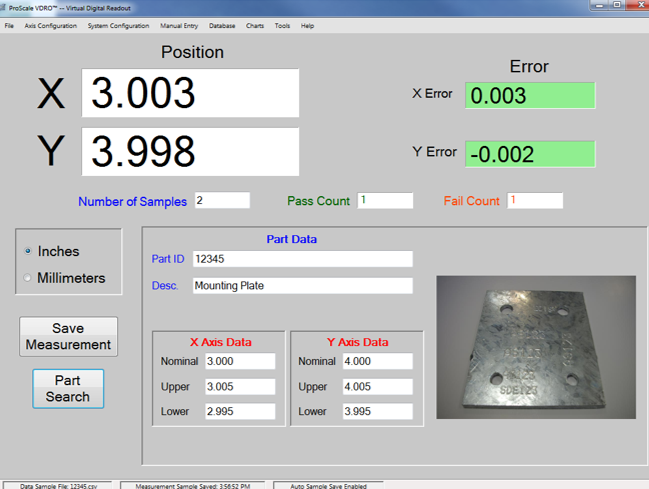
Operators place a part to measure onto the table, close the jaws to the part, and the VDRO software displays the current measurements and the software determines if a part is good. VDRO also shows the error (deviation from nominal), and will highlight the background in green if measurement is good, or in red if measurement is bad. Operators can then (optionally) save the measurements, which creates a CSV file that can be accessed by VDRO to create histograms, or accessed by other programs for additional data processing.
Note: VDRO uses its own, internal database for parts; it cannot use/access an existing database.
“S configuration” (option 3):
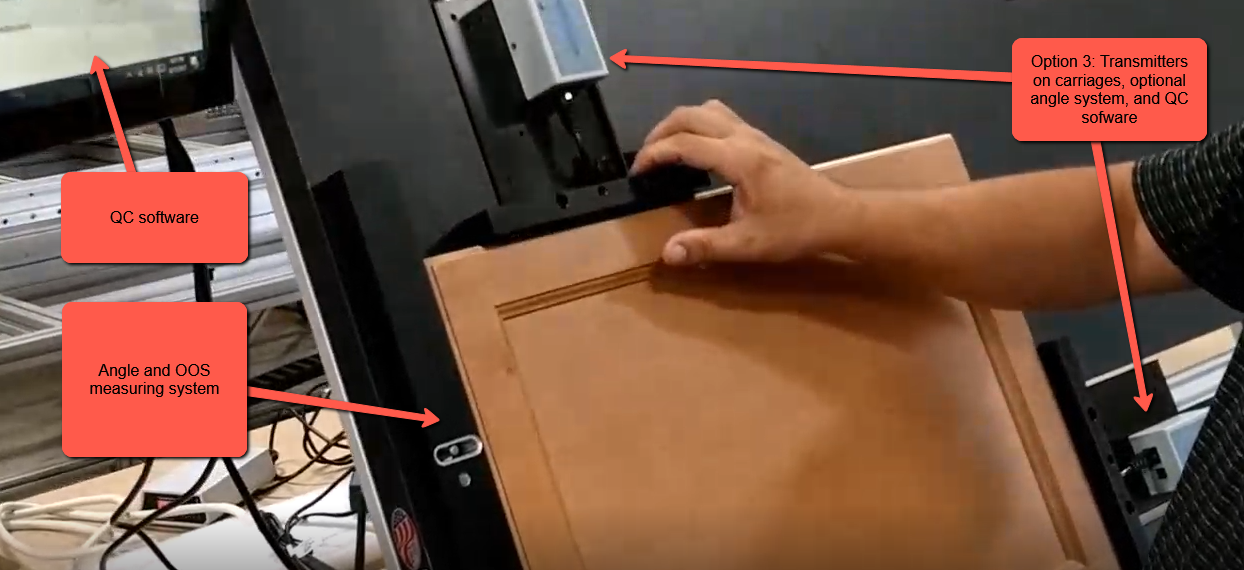
If your company makes parts to fill each customer’s order (rather than to replenish inventory), the “S” configuration may be the best choice.
This version replaces the digital readouts on the carriages with RF transmitters. Both of the RF transmitters send measurements to a remote RF receiver as carriages are moved. The RF receiver connects to a computer on a USB port (an industrial computer is included, and the ProCAB QC software is factory installed and configured). A 22” touchscreen is also included.
Some initial one-time setup is required after the system arrives; you need to map data from your CSV files to the input fields in ProCAB-QC. This process typically takes less than 30 minutes. (Several templates can be created/used if your CSV files are not all formatted the same.)
Operators place a part to measure onto the table, close the jaws to the part, and the QC software displays the current measurements. The operator taps the MEASURE button, and QC software will search the list of parts for a match, checking length, width, angle*, and out-of-square* values and the part’s rotation in the process.
- If no matches are found, the part has failed the quality check.
- If multiple matches are found, the software prompts operator to help choose the right part.
- If only one match is found, that line item is counted, and color coded to indicate line item is partially completed (yellow), or fully completed (green).
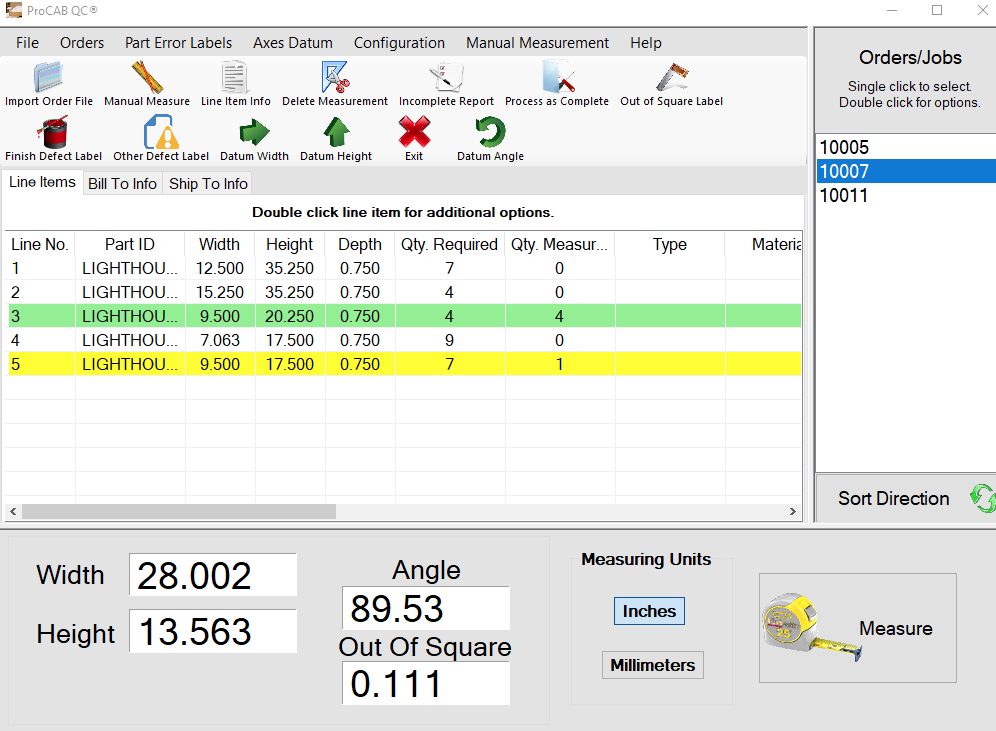
An optional User Message can be displayed following successful measurements. This is helpful for the operator to know where to place the verified parts.
As parts are inspected, the measured values are logged as an CSV file, which is then accessible by other programs for collection/processing.
*Angle and Out-of-Square checking requires Angle Measurement Add-on.
MEASURING RANGE OPTIONS:
Several standard measuring ranges for the ProTable-CAB system are available:
- Small: 20x50 inches (Angle of the table is adjustable from 35-55 degrees, in 10-degree steps.)
- Medium: 40x60 inches (Angle of the table is adjustable from 35-55 degrees, in 10-degree steps.)
- Large: 44x72 inches (Angle of the table is adjustable from 35-55 degrees, in 10-degree steps.)
- XL: 48x96 inches (angle of the table is fixed at 55 degrees)
- XXL: 48x120 inches (angle of the table is fixed at 55 degrees)
Accurate Technology recommends a measuring range is selected that covers at least 98% of the parts a customer will measure. (Manual Measurement mode can be used for remaining 2% of parts if desired, as this saves on cost and floor space.)
Customized ranges are available on request; engineering change fees apply.
ADD-ONS AND ACCESSORIES:
- Angle Measurement Add-On: This accessory must be added at factory when system is built. It allows for qualitative measurements of one side of a panel/sheet during height and width measurements. The measured value for from this add-on is also used for computing Out of Square values. When ProTable-CAB is built with this accessory, the light system behind the vertical fence is removed. This add-on is only compatible with the “S” software configuration.
- Z-axis (depth measurement): This accessory can be added at factory, or after a ProTable-CAB has been delivered. It allows for Z-axis (depth) measurements to be taken on parts or assemblies, such as drawer box depths. This add-on is only compatible with the “S” software configuration.
- Offset block: The minimum width axis measurement possible is approximately 10 inches. If you have parts to inspect with widths smaller than 10 inches, this Offset Block can be temporarily installed and used to measure those parts.
- Calibration block: A custom-made calibration block allows for verification of accuracy on X and Y axes, as well as the angle datum value.
FURTHER CUSTOMIZATION OPTIONS:
- Customized jaws or part contacts: In some cases, an aluminum jaw is not the best contact for your parts. We also offer steel jaws, hardened steel pins, and other custom solutions for the moving carriages. Photos available on request.
- Customized fences: In some cases, aluminum fences are not the best material for your parts. We also offer fences in steel, hardened/plated steel, and softer plastic. Photos available on request.
- Custom tabletop material: If the frequency of gage use is very high, the laminated wood tabletop will wear out over the course of a few years. The tabletop can also be made from plastic sheet, cast aluminum sheet, or plate steel to suit different products and applications. Photos available on request.
- Long-life bearing system: If the frequency of gage use is very high, the standard bearings on the carriages (tight tolerance plastic friction bearings) can be replaced by recirculating linear bearings on hardened steel rails. Photos available on request.
- Specialized software: If neither V or S software choices can be made to work in your environment, our software engineers can often write customized software to suit your needs.
SHIPPING NOTES:
All versions of ProTable-CAB ship on a pallet that is partially enclosed. The pallet must ship LTL freight due to their size and weight. We recommend using Old Dominion Freight Lines (ODFL) because of their excellent attention to detail, and a 15-year record of zero freight claims. If you prefer to use a different carrier, we will notify you when shipment is ready for collection so you can arrange for pickup and processing of related paperwork. (If using your own carrier, we strongly recommend insuring the shipment for its full value.)
Shipping costs via ODFL can be quoted on request, and are valid for 10 days. We require the destination zip code and a phone number for the receiver for all shipments.
LEAD TIME NOTES:
The lead time is set for each system when a formal purchase order arrives. Standard lead times vary from 1 to 6 weeks, depending on system customization and our current workload.
WARRANTY:
One year from date of original shipment. Warranty does not include costs of consumable items such as batteries and bearing liners (their working life depends on time of usage and environment). Warranty status is subject to review by factory when a claim is made.
How to measure parts using a ProTable Cab
Case Study at Greenfield Cabinetry - ProTable-CAB
Greenfield Cabinetry - ProTable-CAB
